Lacuna – Distribution

With the artistic changes that have come to our project we’ve also had to change our way of thinking for the distribution. Previously we had looked exclusively at gallery and art space to exhibit but like I mentioned in my previous blog we now have the opportunity to release it through multiple avenues. It’s important to track how these methods have changed and what that means for our project in the long run.

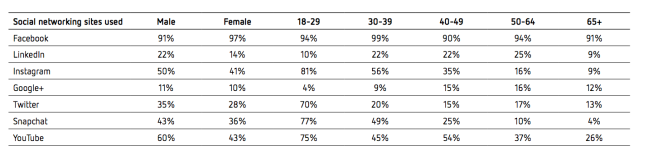
From the 2017 Sensis report you can see that topping the ladder for most used platforms are Facebook and Instagram (Figure 1)

Screen Shot 2017-08-22 at 4.00.59 pm
F 1. 2017 Sensis Social Media Report. Adapted from “Sensis Social Media Report 2017”


This still lines up with our original planning to keep these for our main interactions with our audience. The same report also shows that Facebook is the most used social media platform for ages 18-29 which covers the bulk of our intended target audience (Figure 2).

Screen Shot 2017-08-22 at 3.53.19 pm.png
F 2. 2017 Sensis Social Media Report. Adapted from “Sensis Social Media Report 2017”

The biggest change in our distribution platforms comes from the fact that we now have a transferable video that can exist across multiple different platforms. When deciding where to publish Our final visual album we looked mainly at Youtube and Vimeo. Both have different positives and negatives as a service provider and there was a fair bit to consider. The biggest push for us to put our project on Youtube is for the shear reach that it has. Alexa.com, a website activity tracking company, lists Youtube as the second most visited website in the world compared to Vimeo which was ranked 140th globally at the time of writing. It’s clear that Youtube was the top of this category and gives us the biggest opportunity for our project to be found and spread. Another thing to consider was the quality of each streaming service. Because we’re not just making a purely visual piece it was important to think about how the audio will come across during streamed playback. I found a blog that outlined some of the main technical differences between the two services. Vimeo’s audio streaming services were far superior allowing up to 320kbps but Youtube only supports up to 192kbps. This is important to note because audio plays a key role in the production. We decided after all this that both platforms offered us too much to not include the project on. So our current plan for distribution will include both a Youtube host for community reach and popularity, and a Vimeo host, for superior audio quality.

We’re also considering how we can involve the local Brisbane market in our public presentation. There are a few good options for us to consider that sit in and around the social Brisbane City/Fortitude Valley arts hub. The two places that we’ve looked into in the Valley are the New Globe Theatre which offers a modest amount of seating in a theatre format and The Judith Wright Centre of Contemporary Art which has seating plans for up to 300 people. Both of these offer a good location, enough seating for a small screening as well as supplying audio and visual equipment. Our scouted city location is in a building precinct called Metro Arts and it’s a film theatre room called The Lumen Room. This is a smaller more intimate space that seats around 100 people with a cost of hire around $400 for screenings.

As our project evolves there might be more opportunities for distribution but at our current base level I’m happy with the amount of information we’ve been able to source. Hopefully we can lock down our publishing goals as quickly as possible to ensure we have enough time of planning left over for our showcase.

How Do My Masters Stack Up?

Because this project has been my first ever time mastering a track that I’ve been a part of, I decided it would be beneficial to compare it to some industry standard examples to see how mine matches up. The two key things I’ll be looking at is loudness and dynamics. When I say loudness I’m not referring to the peak loudness of the track because if I’ve done my job right those should be near the same sitting somewhere near 0dB Peak. I’ll be referring to the overall loudness of the track using the LUFS unit which is a standard loudness meter that has become the standard for recording the RMS level of tracks. In regards to the dynamics of the track I’ll be looking at how the tracks breathe and also much compression has been applied and how that has affected the final master.

I’ll be looking at one of my tracks from the album against the song Place To Be off Nick Drake’s 1972  album Pink Moon. I picked this song because of the similarity in instruments and tone. I should point out that there will probably be a fair amount of difference due to the huge gap in time and changes in the mastering process. I’ll only be using a portion of the track by Eamon as he’s planning on releasing it in the future.

So here’s the two wav files side by side as comparison.

Comparisson

As far as dynamics go they look pretty similar in terms of the movement of the songs but the biggest difference I can see in mine is how much more compressed it seems just from looking at the wav file. You can see that there’s a lot more points in my track that reach the ceiling limiter and I feel that this maybe stopped the track from flowing as cleanly as I would’ve liked. I think genre to genre this will definitely change for me but I really wanted this track to have a more laid back feel but because of the compression from the limiter I lost a lot of dynamic range.
The next line of comparison is the loudness of each track. I ran both of the songs through iZotope’s Insight program to get the integrated loudness in LUFS. Here’s the two final results below with the Nick Drake track on the left and mine on the right.


So i really didn’t have a goal when mastering which turned out to be a bit of a problem. Most likely the end result of the album would be for streaming platforms like Itunes and Spotify which have a loudness range that sits from -16 to -14LUFS. I really overstepped the mark with this one and I feel it’s because I was mostly listening to what the sound track (which is a good thing) but failed to go back and make sure I was still hitting the correct targets. You can also notice that the meters are showing that my track has clipped at some point to +0.4dB. There are a couple of reasons why I think this might have happened. Firstly the preset functionality I used for Insight must not be correct for the application I’m using it for or these could be intersample peaks. Because I ran all the audio through a ceiling limiter in theory nothing should’ve got above -0.3dB. I feel that both of these played a role in giving me the peak reading. If it were problems with Insight it would mean that most of my masters could have this issue in them but the good news is that intersample peaking, while still an issue that I’ll need to address and look out for in future projects, isn’t that detrimental to the sound of the finished product. If I’m being honest the issue is far beyond my understanding of the mastering process where I am currently at. All I know for certain is that somewhere in the digital realm there has been a peak, without affecting the final waveform audibly in anyway. This could be happening at frequencies that are outside of the audible range.

I don’t really envision myself becoming a mastering engineer at any stage in my career but the skills are worthwhile knowing about. For my first attempt at mastering I’m quite happy with the result but I still have a lot of issues in my workflow and the final result.

Communication Breakdown

I had a session helping out a friend of mine who’s currently making a short film. He needed a voice over done so I offered to use some studio time and get fellow engineer Jonny Bullpitt to perform some voice over work. Because I wasn’t really involved in the project apart from playing the role as a “service for hire” I noticed a few issues with the way the direction went and thought it would be good to note some solutions for any future projects.

So the biggest problem arose from a communicational grey area between the director and performer. After lines were performed the director would either okay them or decline them but often without giving reasons why he did it. From my outside perspective I could see both parties were getting frustrated because neither had a clear idea of what was actually expected of them. The voice artist was doing their best to match the feedback from the director but it would often take three or four attempts before the real vision of the performance was achieved. There was also a huge problem in that the script wasn’t finalised during the session, meaning there were changes still being made on the fly during recording. This just lead to the recording taking longer than it needed and the voice artist coming out of the session feeling a bit drained

I think that the biggest thing I took away from the session was that when working with an artist you need to be painfully obvious and aware of what your motives are. The less direct you are the more likely it can cause issues. It’s can be difficult sometimes when giving blunt advice or direction as it can come across as standoffish or rude but it’s important to ensure that you get the correct performance out of the artist and that your artistic ideas are met. I think that also means that you need to have a good idea of what you want for yourself. By getting your goals clear in your head it’s going to lead to a session that is more comfortable for you and your artists.

Reflections

Before I started my current project I created a pre-production plan to give me an idea on what studios, microphones and equipment I might need to help me achieve my goals. I thought it would be beneficial to talk about how I came to those decisions and if or who those decisions might have changed throughout the recording process. I’m going to be tackling this by looking at each element of the recording in sequence talking about why I originally choose the microphone and if the result I ended with was still relatable to my original thoughts.

So the obvious place to start in my head is the recording console I chose to use. I wanted to use the Neve Custom Series 75 right from the beginning for two major reasons.

NEVE.jpg
Neve Custom Series 75. Retrieved from https://www.soundonsound.com/reviews/neve-manufacturing-australia-custom-series-75

Firstly the live room attached to it has a really dead or dampened sound. In the below samples you can hear the difference between the between the Neve’s live room and another. The sound of the Neve live room is a lot more dampened and I felt would help the mix gel more tightly together. If you listen to the sound of the other room the first thing you should notice is how the tail end of the clap lingers for a longer time than in the Neve. It has a more excited sound that adds a little bit of reverb to the original sound source and with it some more top end frequencies. The first three claps are from the Neve’s live room and the last three are from a different live room.

The other reason I chose the Neve desk was because of it’s notoriety for giving a really well rounded and warm analogue sound. Because the desk is really forgiving in terms of it’s preamp gain structure you can achieve the distortion by running signal on the console quite loud. As long as the input into your DAW isn’t clipping you’ll end up adding that distorted character to your signal. I wanted this especially for the vocals in the project because they were the star of the performer I wanted the slight analogue distortion from the desk to help give them a boost of presence and grit. I felt that by using the desk as a piece of analogue gear I would get a result that still gave me what I wanted but would eliminate the chances of the sound taking in any digital qualities.


So how did it all go?

During the studio recordings I sort of lost track of my original ideas of how I wanted the vocals to sound and instead just started to listen to what sounded good. My only real mantra was that as long as it wasn’t peaking in Pro Tools it was still usable audio. While this was freeing for me in terms of studio flow it put me out of the mindset of achieving specific goals through the recording. I did end up running the vocals through the desk at a fairly loud level, (but not because I aimed to but because it sounded good) almost reaching the peak on the Neve. Listening back to it know you can hear an added warmth and crunch in the mid range in the vocals. I think this went a long way in helping the vocals stand out over the acoustic guitars as the body of each sound sits predominantly into that frequency band. The guitar and vocal balance has always been a challenge for me and using the desk as an analogue distortion or exciter plugin kept the sound in the analogue realm but still gave me the desired effect. To continue in this point I’m going to discuss how I recorded the guitars to further get the spectral and spatial balance between them and the vocals.


Guitars

So the guitars were a big thing for me in terms of the recording process. I wanted to get the right sound for the project. I looked at two things in particular, the microphone choice and recording technique. For the microphones I had a clear opinion in what I needed for the production. As Eamon has quite a deep register in his voice I knew that I would need something that was capable of cutting through that. This lead me straight to the thought of a small diaphragm condenser microphone, it would still have all the presence and frequency response I needed for the low end energy but would let me capture some of the top end sizzle of the guitar. My choices for microphones were pretty broad but I narrowed it down to either the Neumann KM184 or the DPA 4011A. Both are fantastic microphones and offer some interesting characteristics. I looked at the specifications for each microphone and also used this video to give a rough idea of how the end result might sound. The DPA has more of a flat frequency response than the KM184 and would likely give a more accurate or true to life recording. I decided though that I would use the Neumann because of the added presence from 5-10kHz. I felt this this would add some colour to the recording and help me to get the extra detail and brightness I was after in the high frequency range.

DPA4011A
DPA 4011A Frequency Response Chart. Retrived from http://www.dpamicrophones.com/microphones/ddicate/4011a-cardioid-microphone
KM184
Neumann KM184 Frequency Response Chart. Retrieved from https://www.neumann.com/?lang=en&id=current_microphones&cid=km180_data

I also looked for examples of different stereo microphone setups to help get a better understanding of what might benefit me in the production. The XY and ORTF pairs are is generally looked at as the more naturally sounding setups for stereo microphones. Usually this would be one of my goto techniques because of how easy and efficient it is to find a good sound and then reproduce consistently across different sessions. However I thought I would try something a bit different for this recording and go with an AB wide spacing stereo mix. The thought process behind this was that I would still be left with a guitar sound that is sonically pleasing while also leaving space in the stereofield for the vocals to sit. I aimed one of the microphones at around the 8-12th fret of the guitar and one directly at the sound hole.


Results

I was really happy with how the whole guitar section ended up, mostly with the amount of stereo width I got on it. I got some feedback from a fellow engineer Callum Hicks who thought that I had used some kind of stereo widening processing for the acoustic guitar channels. I was an oddly satisfying feeling when I told him that it was all done in the recording process and really solidified to me just how important the recordings can be. Not just for the technical sounds of the recording but even for creative processing before the mix stage. Here’s just the guitars on there own panned to the left and right and an image of the chorus section run through iZotope Ozone’s stereo imager to show the width.

OZONE Guitar Width

I was really happy with the final result and you should be able to hear that there is quite a large gap in the middle of the stereofield just waiting to be filled by the vocals.


It’s a really good process going back through and looking at what my original plans were and whether they ended up working as I intended. I think this time I stuck pretty closely with my original idea and I’m really happy with the result.

Updates!!

Hi all just wanted to give a quick update on how my projects are going at the moment. The album that I’m working on has been fully recorded now and I’ve got a first draft of my masters done. I’ve got some really good feedback on terms of spectral balance that I need to address but I still have plenty of time to get in the studio and remix/master before it’s due.

I’ve also been in contact with a film group who are making a documentary about the Boggo Road Gaol who wanted me to create some sound design and atmos elements. It’s fairly short list of things I need to create for a dramatised section of the film. Thing’s like water dripping into a bucket, sounds of creaking metal doors, footsteps and the sound of certain items hitting the floor. I’ve already started working on the sounds and have given some rough samples to the audio director of the project who gave me some really great praise on what I had done. In particular she was really pleased with the atmos sound saying that it gave the feeling of actually being there. I’ll probably end up doing a blog in the future that talks about how I created this sound

The final little thing I’ve been up to recently was working with a photographer to get some professional pictures taken for my portfolio. I’ve worked with Hannah previously when she designed artwork for an EP I put out late last year. She joined me in one of my studio sessions, setup some lighting and went about trying to capture me as I worked. I’m a bit photo shy so I was thrown a little bit out of my element but I’m happy with some of the results that we got (Side note the Neve Series 75 is a really good looking console to have in the back). I’ve given Hannah a lot of freedom in the editing because I’ve always liked her creative approach to design. These are some of the raw photos yet to be edited.


So that’s it for now, I’ll be sure to give an update when the final version of the Boggo Road documentary is uploaded.

Project Management and Reflection

So I know this might seem like a  pretty boring topic at first but trust me it’s something that I guarantee you’ll run into issues someday with. My recent project has really put to the test my project management skills. It’s an area of my work that I’ve really come along way in. Some of my first projects were a mess that would normally end up being delayed and rushed a week before they were due. It was harder for me to make backup plans and I could often find myself losing focus or motivation towards the project. This time I wanted to do things differently, so from the start I started adding resources that I could use to keep me focused and on track.

The biggest difference I’ve seen in my project work has been the inclusion of Google Calendars and Sheets. Being able to book studio for recording and mixing and put them into a calendar that I can then plan other events around has been such a simple yet effective way to manage my time. Being able to open my calendar at the start of the week and see what is happening and what needs to be completed allows me to focus my time more efficiently and to keep track of approaching milestones and deadlines.

ExampleCalander
Example week showing commitments inside and outside the project

The other tool that I’ve introduced to my workflow is Google Sheets. I found an online script that imports the data from your google calendar into a spreadsheet document. I then added on extra columns to include a space for tasks needing to be completed and notetaking for during and after sessions.

Sheets
Notes/Tasks for my sessions

Because of this I can come into each session with a clear idea of what I want to achieve and a rough idea of how I can do it. It also means that I can distinguish what I can do at home vs the studio. If for instance I need specific equipment for a portion of a song, I’ll know that it will need some specific studio time put aside for it.
I also created a table of what needs to be recorded for each song to allow multi tracking of different songs in a single session. It also made it easier to plan what equipment I would need to use based on each songs requirement. This has made it extremely easy to plan my sessions in advance which means I’ve been able to get more achieved in them. This also helps when dealing with multiple projects running simultaneously. It’s made it a lot less difficult to separate my projects in both a technical aspect and also a mental headspace. I’ve now found it a lot easier to go from project to project and not have to spend as much time getting myself into a different mindset.

Table
So far this has been a huge upgrade to how I used to work my projects and it was only a couple of weeks in that I started noticing improvements. Even at this stage when I’m still working towards a deadline I feel a lot less stressed about my workload and confident that I’m going to finish it all at a standard that I’m happy with.

Removing Noise

After my last tutorial I thought it might be a good idea to cover some of the other processes I used in this project. One of those was a noise removal plugin by iZotope called RX. RX is a full audio suite that covers a range of specific noise removal tools. The whole program contains a huge bunch of tools that can be used for a wide range of applications but for $1200 you’d expect that.

In my project I recorded a guitar amp for most songs and found that there was a lot of noise coming from the idle amp. To counter this I used the De-noise plugin. When you open up the program you should see three main features in the window, learn, threshold and reduction.

Screen Shot 2017-08-06 at 12.25.14 PM

The first function you’ll need to use is the learn function. Once activated you can play a section of the noise in your DAW and De-noise will listen and learn the frequencies of the noise.

Screen Shot 2017-08-06 at 12.25.26 PM
De-noise with the “learn” function engaged

If you play back the audio now, you should be able to hear a huge improvement from before. You might be happy with the result here but you can tweak it even more using the other two functions mentioned before.

The threshold setting controls the level at which the plugin starts to attenuate the learnt frequencies. It can be important to get a good setting with this function especially with low level signal. This is because there your desired signal could share similar frequency with the unwanted so you could accidentally remove some of your signal. The reduction function controls how much the learnt frequencies are being removed. As you sweep it up and down you should be able to hear how much is being removed from the original sound.

In the below example I’ve put the original clip first, followed by the clip that now has De-noise applied to it and in the final section I’ve automated the reduction levels to change to demonstrate the difference that the plugin makes.

It’s a really simple process that can improve recordings in a huge way and I would highly recommend getting your hands on it.

Contracts

Contracts, what are they? What do they do? If you’re in the audio industry there’s pretty much a guarantee that you’ll eventually run into some kind of contract. With that in mind it’s probably a good idea that you get a good grasp on what exactly the point of a contract is.

To put it bluntly contracts are there to save your ass legally. It provides a way for businesses or individuals traders to put in a legally binding way what they are and aren’t willing or able to provide. Also it provides cover for performers or artists so their work is protected. In my current project the artist Eamon is wanting to release their work through a distribution platform so we thought it would be best to draw up a contract between us so we both have a strong idea of what we’ll be leaving the project with.

The way Australian copyright works is that once something has been written or formed in someway the creator holds the copyright for that piece. So Because the songs have been written by Eamon he holds all the rights to the lyrics and music.

Normally producers and recording engineers don’t take a percentage of the copyright as they are paid for their services upfront. As this is the role that I’m taking on, the main thing that needs to be stated in the contract is that my services have been paid for and that I release my rights to the physical recordings of the songs. If this isn’t drawn up somewhere in a contract I could later on make a claim that I should be able to take royalties from the songs as I’ve worked on them.

After doing a bit of research I came across this page that pointed me in the right direction as to what kind of documentation would be most suitable for our agreement. I decided that because this is a smaller scale project a simple written agreement stating what is required of both of us would suffice.

Sample Contract:


Service Provider Details

James Reynolds

Fake Street, New Farm, 4005, QLD

07 4023 5689

The following is an agreement between James Reynolds (The Service Provider) and Eamon Webb(The Artist) for the services of recording and mixing.

Services Provided by James Reynolds

  • Recording of all instrumentation
  • Mixing of all songs
  • Recording spaces
  • Recording equipment

Expectations and Services provided by Eamon Webb

  • Must source own instruments and vocals
  • Written music and lyrics

Payment

The artist will provide payment to the service provider of $20 per hour for studio sessions and a rate of $50 per song for mixing.

Rights

Upon complete payment the rights to the recorded material partially owned by the service provider will transfer to the artist.

Service Provider

Date:

Signature:

Artist

Date:

Signature:

I feel that while this could be certainly be more in depth of a contract between me and Eamon it highlights the main issues that could arise from this project.


A Brief Introduction to Contracts for Freelance Engineers, Mixers and Producers. (2017). Tapeop.com. Retrieved  from http://tapeop.com/tutorials/73/intro-contracts/

Recording Studio Agreement. (2017). FreeAdvice. Retrieved  from https://law.freeadvice.com/intellectual_property/music_law/recording_studio_agreement.htm

Sample Contract. (2017). Redlightfeverproductions.com. Retrieved from http://www.redlightfeverproductions.com/Recording_Contract.html

Lacuna – Evolution

With the formative planning stages of Lacuna coming to end I thought it would be a good opportunity to talk a little bit about the project has developed over the past 13 weeks. We first came into the idea with bright eyes and an idea that was way beyond anything we had ever attempted before. Our original plan for the production was to create a fully interactive audio/visual art installation. None of us had ever really made the jump into a live arena and it was exhilarating to be exploring it but we soon found out tough that we were a little bit in over our heads. There was also physical constraints that were holdings us back as well, money being one of the biggest issues. After researching different spaces around Brisbane and the cost of equipment we would need the project’s budget started to get out of hand for what we were prepared for. So through our meetings we discussed ways of how we could scale back our goals to something that seemed a bit more manageable for our combined skillset.

We settled on reducing the project down into just an audio/visual experience in the form of a visual album. We felt that this still kept the core collaborative and solo production elements of the project but put it into a more realistic scenario. Because we were now just focusing on a single product rather than trying to accommodate an interactive live scenario to match it we felt that it would leave us with a more focused and detailed piece. This is important because from the start we were aiming to create a highly interesting artwork with a professional polish. While the “installation” side of things had disappeared from our project we still discussed other ways that we could get the work into a public space. Now that the project had been scaled back a bit and was in a format that could translate across multiple spaces it opened up a whole different avenue of showcasing. We could focus less on actually setting up and designing a whole installation and more on spaces, like cinemas and galleries, that we could publicly exhibit the final visual album. It’s also made it a far more accessible product as we now had the option of releasing it on physical disc as well as a variety of online streaming platforms. From a marketing standpoint it was a great decision for us and I think even from a creative view of the project it really helped to focus and motivate us further.

I think that this was probably the turning point of our project and helped reassure the group that we were still creating something in line with our original plan but it had just been modified to further suit us personally. Looking back on it I can say that we were very naive in the way we were thinking, but I’m happy we started with our goals so high. This gave us heaps of room to scale back the scope of the project and still be sitting on an idea that we were still excited to work on. I’m really excited to see where we end up with Lacuna and am looking forward to hearing what the public says about it.

Chloe has also done a really great job of showing a few other elements of our project development on her blog.