I’m in the final stages of this project now and everything is going extremely well. Last week me and the graphic designer agreed upon a final copy of the album art and bandcamp graphics. All recordings have been completed and a final studio session has been booked to act as an emergency session (if anything goes wrong) or as a time to finalize the tracks using the Izotope mastering suite. I have talked with the artist that will be performing to figure out his equipment needs. The main things I want to talk about are the live sound setup and the field recording I did for one of the tracks.
The field recording was done to get samples of waves breaking. Because I don’t have a car it’s not very easy to get to quiet places that have water so I found it a bit of a struggle to get clean water audio sounds. I recorded at a spot along south bank that had no traffic behind it but unfortunately there was quite heavy traffic on the other side of the bank. I did my best to position the microphone to cancel out as much as I could. Looking back on it a boom pole would have been a good thing to have as I could have positioned the microphone a lot easier. I own a Zoom H4n which has reasonable quality mic preamps but as this is my first major musical release I wanted a more professional sound so I decided to get the Zoom F8 out and give that a shot.
It performed a lot better than I would’ve imagined. The difference in the preamps meant that gain could be controlled much better than on my H4n. I didn’t have to adjust the gain radically to get softer sounds which meant that overall there was a lot less ambient noise in the recording. The only thing that didn’t really turn out how I would’ve expected was the microphone choice. I used the Rode NTG1 as it was the only available microphone at the time. Normally I would be using the Sennheiser MKH416 as it boasts a better frequency response, sensitivity and equivalent noise level. I feel that the MKH416 would have made it easier to capture specifics sounds than the NTG1.
For the live sound I had looked around at places to rent PA systems and to my surprise the options I found were cheaper than I had expected. Some package deals that included two speakers, stands and a mixer were only around $70-$90 per day. To be honest that is a really reasonable price for what I am wanting to put on. But as always being the stereotypical poor uni student I am I put my networking skills to action and hunted around my friends to find gear I could borrow. Considering I only have one XLR cable I reached out to a friend that I know has a whole pile them and he was happy to help. I also own an old small portable mixer but I knew someone that had a more modern one which I thought would be a lot more intuitive. He was also happy to help and also offered me a set of 12” Behringer powered speakers. I wasn’t sure about the using the speakers as I’ve never been involved in live sound before but after talking to one of the sound hire companies in Brisbane they suggested that I use powered speakers instead of the deal that I was going for originally which sealed the deal for me. I’ve drawn up a quick diagram of how I’m going to run the system on the night just to give you an idea and also a reference for myself.
So while this isn’t as “professional” as a normal EP launch might be I’m really happy with the DIY event I’ve put together. Fingers crossed everything will go smoothly on the night but I know from experience that is never the case.
This case study aims to analyze and explore the different productions techniques and stylistic choices made by Xiu Xiu on their song Sad Redux-O-Grapher. For reference I have used the 2003 album version.
Xiu Xiu are an American experimental noise band that have released thirteen studio albums with another one set to release soon. Their 2003 release A Promise throws the production rule book out the window with their experimental sounds, erratic rhythm and curious production techniques. Sad Redux-O-Grapher puts these together to craft a track that plays outside of music conventions and encourages the listener to follow with them.
Song Sequence
Unlike the heading above might suggest this song doesn’t really follow any common musical sequence. The song is split into three distinct sections. The first going from 0:00 – 1:50, second 1:50 – 2:30 and the third section from 2:30 to the end of the track.
Section One
The vocals performed by Jamie Stewart feature in sections one and three. Like their previous releases and other songs off the album Stewart’s vocals are performed in an airy falsetto way. His voice is wavers around the notes giving a shaky feel to the performance. At the 0:30s mark an octaver effect is added to the vocals pitching the original vocal line up and adding fuzz. Near the end of the first section he moves from singing to yelling with his voice clearly breaking at points.
The majority of the first section is made up of an arpeggiated synth line. At the very beginning of the track there is a simple sine wave synthesiser. I have attempted to rebuild this synthesizer inside ableton to showcase one approach they could have used. A simple sine wave was used inside the operator synth with a filter cutoff at 2kHz to remove the high frequency content from the signal. This is an extremely basic synthesizer with the interest coming from the arpeggiator. The arpeggiator has been crafted to include both the arpeggiated notes and the constant sine wave underneath. At the 0:15s mark a duplicate of the synthesizer is brought in that runs down an arpeggiated pattern. At both the 1:10 and 1:20 mark a delay is added to the synthesizer.
My Created Arp Synth
At the 0:28s mark of the first section a string instrument is introduced. In their previous record live brass instruments were used so it’s fairly safe to say that this is played live rather than sampled instrument. There are also multiple layers combined with each other presumably from multiple recordings. While I can’t say for certain as to which instrument it is my guess would be either a violin or viola as these instruments are have a predominantly mid to high range of notes. The violin is airy and bright with a strong high frequency response. This leads me to believe that they were recorded using a large-diaphragm condenser microphone.
A whistle is briefly introduced at 0:50s which has similar characteristics to the stringed instrument. It is difficult to tell whether the reverb on it has been added digitally or whether it was recorded in a room with those characteristics.
The final instrumentation for the first section is a percussion group. It is brought in at the 0:52s mark. The playing style is irregular seeming to move with no intention to stay in time with the arpeggiated synth. The percussion is made up mainly of rim shots but also includes two or three tom drums and a hi-hat. Like the violin and whistle there is a faint reverb on the drums. Because all of these elements featured a similar reverb I feel that the reverb has come from the acoustics of the recording room.
Section Two
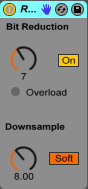
There is only one synthesizer used in the second section. It’s hard to identify what the original synthesizer sounded like because there has been some kind of bit reduction added to it. I have recreated a similar sounding synthesizer inside Ableton using a premade synthesizer and adding the redux plugin. I reduced the the bit depth to 7 and put the downsampling resolution to 8 meaning that only every 8th sample selection will be output.
Section Three
The violin and vocals in this section are practically identical to the first section with the vocals being reproduced using the octaver technique.
The arpeggiated synth line also comes back but this time is played much lower acting as a driving bass line. This line lasts from 2:30 to 2:50.
The percussion also returns with a driving low tom roll. While the body of the drums sound quite full and rich there is a hollowness to the tail end of the sound like they are occupying a large space.
Spectral Analysis and Equalization
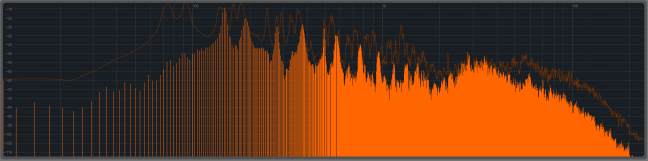
Throughout the three sections of the song the spectral balance changes. During the first section of the song we have the most elements playing at one given time. This section represents the broadest frequency spectrum. The arpeggiated synth makes up the low to mid band ranging from around 100Hz at its lowest to just over 1kHz. This leaves room in the upper range for Stewart’s vocals and the stringed instrument. With the available room they don’t have to compete for the listeners attention. Because of Stewart’s falsetto singing it means he leans more to the higher band letting the strings sit in the mid range nicely.
Section One
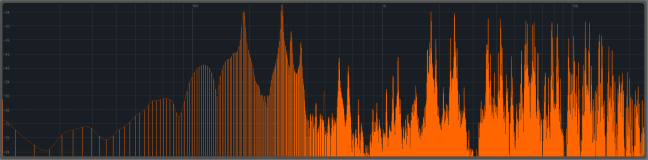
Because the second section is made up of only one synthesizer it has nothing to compete with and can comfortably sit within a very wide frequency range. In the image below you can see that the frequency peaks are very slim which can be attributed to the bit depth being lowered.
Section Two
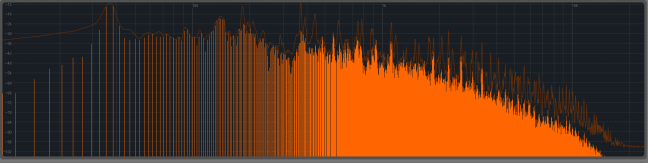
Section three has been crafted to give room for the stringed instrument. The only other instruments present are the lower synth line and the low toms. The synth line also drops out half way through this section to ensure that the full build up of the tom roll isn’t being masked in anyway by the synthesizer.
Dynamic Range and Amplitude
While it is clear that the dynamics of the song change considerably from section to section there are points inside the sections that have a varied dynamic range. Most notably are the two instances in the first section where delay is added to the synthesiser (1:10,1:20) and the section of vocals that have been yelled (1:44). It doesn’t seem like compression has been applied to these two instances as the volume changes considerably and is allowed to clip.
Stereo Soundfield
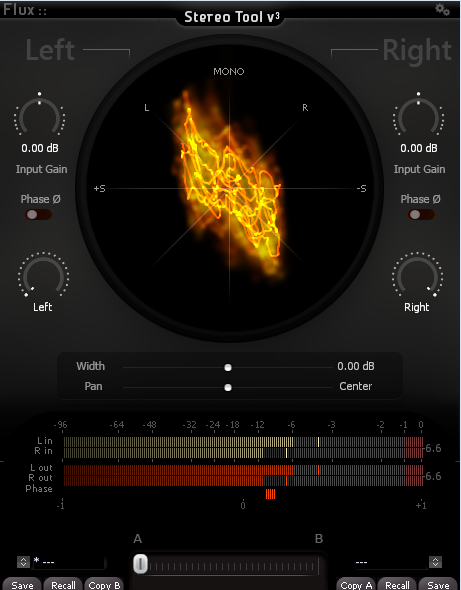
From the very first hearing of this song one thing stood out to me the most and that is how left leaning the track is inside a stereofield. It’s easy to see from the stereo waveform alone that the track is heavily weighted to the left side. This steroscope image was taken at the 0:30s mark where most of the first sections instruments are playing at once. Even with all the instruments it is still a weighted mix.
Section One
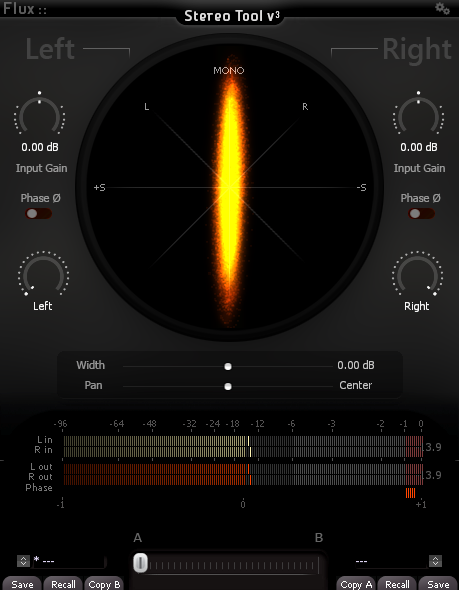
The second section is positioned in the centre of the field with slight variation either side based on how the instrument was built and the bit reduction applied to it.
Section Two
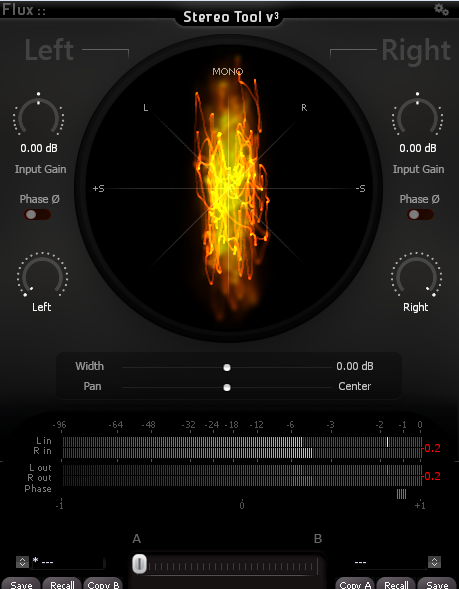
The third sections represents a more “usual” stereofield with the driving synth bassline and toms sitting centre while the vocals and violin play around moving from left to right.
When putting the song through a mono plugin in Ableton there isn’t anything lost in regards to phase. There are some small instrumentation clashes when summed to mono but overall the mix stays relatively similar. I think the panning effects that have been applied to the song were done to let each instrument stand on it’s own. It is a very basic mix of instruments and by putting them in their own positions it reduced the risk of any masking issues that could’ve come up.
Sampling instruments and sound effects is a vital part of the way I create music. I love taking interesting and obscure sounds and morphing them into something I find musically pleasing. I work in Ableton predominantly and use the Samplerinstrument. It provides me with all the tools that I need to create something. However up until about a week ago I realised I wasn’t using it to it’s full ability.
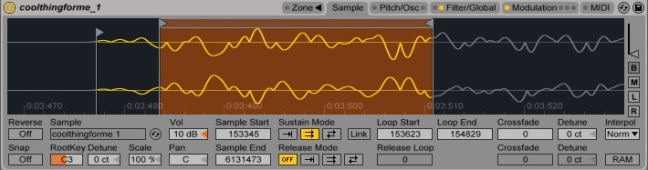
The biggest feature that I wasn’t taking advantage of was the ability to use it as a multisample instrument. Basically what the means is you can assign different sounds to different regions of the keyboard. In the picture below I’ve gotten some samples of a viola and matched their real life ranges to the range on the keyboard.
You can also assign velocity sensitive parameters to keys. I used this in a short example song to affect a multisampled drum pad. When the key is pressed with a velocity below 55 the original drum sample is played, however if played at any rate higher than that a pitched down version of the sample is played. This song was put together more as a proof of concept than anything.
Knowing this about three weeks ago would have been handy. If you haven’t read my previous blog about my score for a film I suggest you go read that here just to get some context. Basically I needed to create a violin sound and I had found a website that offered an extensive range of recorded symphonic instruments. I ended up just using a single note out of the sample I had and playing a pitch shifted versions to achieve a melodic pattern. If I had have known about the power of sampler before doing this task I would have created a full keyboard where each violin note was applied to its correct place on the keyboard. This would have gotten me a more truer sound for the sampled violin.
I’m glad I delved a bit deeper into the sampler as now I can create more varied and interesting keyboard instruments. Also if I ever need to use sampled instruments for another project I know how to map the sounds correctly to a keyboard.
There are many different ways to create synthesizer patches, most commonly we hear of frequency modulation, additive and subtractive. Subtractive and additive synthesis involve taking away or adding waves to modify the sound. Frequency Modulation synthesis is done by feeding an original sound wave through another wave and outputting the new wave. Today however I’m going to be talking about a more unusual way of creating synthesiser sounds. Granular synthesis is done by taking short snippets of an audio clip which are referred to as “grains” and using different combinations of pitch, speed or volume to create interesting synthesised sounds. Here is an interesting video by Robert Henke that goes into how he created a granular synthesis use Max for Live inside Ableton.
The ability to take a sample of something complete random and shape into different sonic textures really interests me. I’ve used the sampler inside Ableton before to create music out of sounds, I’ve put a song below that I made a couple of years back using chopped samples from a musical recording.
I thought I would delve a bit deeper into granular synthesis and try and create a rough minute long demo to give an idea of the kinds of sounds you can make.
I found this tutorial on youtube and decided to give it a go.
I used a sample of a band recording I had done a couple of months back and took a slice of about 30 milliseconds.
Then following the tutorial I linked the samples start point to an external controller meaning I could change the sound on the fly. I duplicated this sound inside the instrument and applied a frequency shift of 250Hz to modify the sound a little bit.
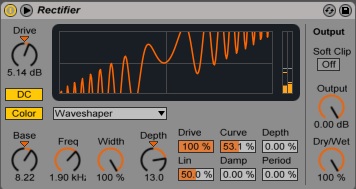
I then added a waveshaper saturator to beef up the sound a little bit.
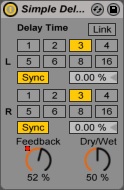
Finally I added a delay to the sound and experimented with the feedback until I had a sound that I liked.
For the short piece of music I made to accompany this synthesis I found putting a midi arpeggiator onto the track and using the gate function to reduce it to more of a stab effect was cool. I decided to build around this. I’ve put the song below as just a demo of what can be done with granular synthesis. All the snyths were made using this technique and the drum loop was from Ableton’s sample stock pack. I’m looking forward to experimenting more with granular especially in creating evolving or atmospheric pads.
Today i had a four hour session using the Audient 2040 to record a solo tenor saxophone. I didn’t end up creating a full preproduction plan as I knew that I would only be using three microphones maximum. The microphones we ended up using were the ElectroVoice RE20 and the AKG C414.
I had first seen the RE20 used in this live performance by Kamasi Washington (his solo starts around the 2:40 mark). It is notorious for capturing low end frequencies extremely well and with little proximity effect. It also has a high SPL level which I though would be necessary with the experimental way I chose to use it.
We tried out the microphone at different depths inside the bell of the saxophone until I settled on a sound that I liked. There were certain spots that would peak the levels from air pushing out and other spots that sounded too bright. I eventually settled on a spot that I liked. I had the saxophonist play extremely loud which ended up distorting the sound a bit but added a lot to the overall grittiness of the production.
I had done some previous research on recording saxophones before I booked this session. One blog I found did a good job of narrowing down some of the options I had explored. After listening to some youtube videos comparing microphones it was clear that the C414 stood out the most to me.
I positioned the mic around one metre away and level with the bell. It ended up giving a really bright and clean sound which enhanced the frequency range of the tenor saxophone. One problem we ran into was when the artist was playing softly there was a high frequency that almost sounded like static. The artist told me that it is common when playing quietly to hear air from the bell so we carried on with the recording. Looking back at it now I should have experimented with moving the microphone off axis to the bell to try and alleviate some of that unwanted noise. When talking to another recording artist they said It could have been something to do with the players reed being too tight. It acted as a good lesson to remind me that I need to research in more detail before I take on something that I’m really not familiar with.
Unfortunately I’m not going to have another opportunity to re-record the artist which is a bit disappointing but overall I got around 15 minutes if improvised sax lines that I can use as they are or incorporate elements of sampling in my upcoming project
This week on Monday I pitched my idea for my second project. As a whole the pitch went down really well and got some really positive feedback from both the lecturers and my friends. The point I took away from the presentation was to scrap the idea of filming a music video to go along with the EP launch. While I was really excited to be working on a video it made the most sense and I’m glad it was brought up. Out of all the things I had planned for this project that was the one that I was most nervous about because of the director’s previous responsibilities. It makes sense to put this behind me for a bit and focus more in getting my songs completed ready for exhibition. This doesn’t mean it won’t ever happen either, because me and the director are close friends we’ve both talked and he is still interested in pursuing the project later on.
The other key point that got brought up during the pitch was the use of a public space that isn’t owned or endorsed by SAE. The lecturers thought this was a really good idea as instead of using equipment and space that I already had access to I was going out and trying to create my own space. I loved this idea to especially the fact that it would mean I would have to find some really crafty DIY solutions to tech problems. Working out how to run the show on what I own or what I can borrow from friends was an idea that really got me excited for the project!
As for the event space I’ve had my first reply back. Unfortunately I may have underestimated what exactly needs to go into planning for the use of a space. The response I got back was mostly positive except for one thing… Public Liability Insurance. I initially had no idea what this was and after researching found that it was basically an insurance to cover you in case anyone is hurt or suffers in some way while at an event you are hosting. As I don’t have my own ABN I’m not even eligible for this cover(not that I could afford it anyway). I messaged them back asking some clarifying questions and offered to pay a bond as a way of working around this. I don’t have high hopes of getting this space as I understand that these conditions are important to keep their business running smoothly as well.
I’ve looked back at some of the other spaces offered on the creative spaces website and found some more that could be suitable that I’ll be contacting tomorrow. I’m also thinking at this stage I should organize a meeting with SAE to discuss the possibility of hosting it there. While these aren’t my first choice I would rather still have the EP launch rather than not. Hopefully in the coming weeks I can update you all with some more positive news.
This case study has been created to discuss production techniques and points of interest in Sneaker Pimps song “Wasted Early Sunday Morning”. For this analysis I have used the 1996 album version.
Wasted Early Sunday Morning was a song off of Sneaker Pimp’s first album release Becoming X in 1996. This album garnered much success as it was released during the pinnacle of trip hop music. Trip hop can be a hard genre to describe as it contains a wide variety of elements drawing from different genres. In his book Dance Music Manual : Tools, Toys and Techniques Snoman describes it as an eclectic mix of acoustic and electronic instruments, combining ideas from R ‘n’ B, hip-hop, dub, ambient, industrial and jazz.
Following the guidelines of trip hop music the instrumentation in this track features mainly acoustic instruments with added synthesizers.
In this track there are seven main instruments:
Vocals
The vocals in this track provided by Kelli Ali have an airy and high pitched sound to them and fill most of the high end of the song.
Drums
While there is a tendency in the trip hop genre to use a lot of sampled drum breaks from records I think in this song however the drums have been recorded live. They lack any kind of deformation from records e.g crackle, hiss or pop and also the complexity of breaks and rolls tells me that it probably isn’t a drum loop.
Acoustic Bass
While I’m not sure on exactly what kind of acoustic bass is featured in this song, I am confident that it is acoustic and not an electronic reproduction of a bass sound. As trip hop takes a lot of influence from jazz I wouldn’t be surprised if it turned out to be an upright bass.
Acoustic Guitar
The acoustic guitar in this song can audibly be heard using a slide. Slide guitar is technique that uses a device to produce glissando notes allowing the notes to glide into each other and create astounding vibrato effects.
“Airy” Synth
The “airy” synth as I’ve called it can be heard at the very start of the song during the intro consists of a synthesized piano sound almost like a rhodes piano. It plays a single chord stab and then takes roughly two bars to trail off with a significant reverb tail.
Synth Bass
The synth bass line happens during the end of the chorus. It’s easy to hear from the sound that it is some kind of distorted synthesizer. Based on the distortion I would surmise that it has been created using a type of frequency modulator synthesis as the distorted characteristics fit in that category more than an additive synthesis.
Resonator Synth
The resonator synth as I have called it appears during the break between the choruses and verse. It consists of a synthesized sound that uses a “ping pong” delay or panning effect to bounce the sound between the left and right channels. You can just barely hear the sound peaking near the end which from previous experience using resonance sweeps tells me that the sound has been modulated through resonance in some way.
Song Sequence
The structure of this song is extremely basic. The song begins with a short intro before moving into a standard ABAB form. There is a short instrumental after the first chorus and the song also ends with a long outro.
Spectral Analysis and Equalization
The distribution of frequency information in this song is quite varied and full. The mid to high range bands are the most dominating because of the importance drawn to the vocals and slide guitar. The female voice sits predominantly in the 2kHz-4kHz range with frequencies from 4kHz-10kHz making up the sibilance and breathy areas of vocals. This article here about recording acoustic guitar talks on the importance of using the context of the song to dictate your recordings. Because the guitar is played using a slide there would have been a decision to mic accordingly to enhance the sounds from the slide and give the guitar more presence. I believe this was done to ensure enough room was left in the low end of the spectrum to account for the bass guitar, drums and bass synthesizer.
Dynamic Range and Amplitude
When listening for the use of compression and other dynamic processing I found it quite difficult to pinpoint any. I feel that this comes down to the genre and instrumentation. When comparing a song like this that draws heavily from jazz and other “more traditional” genres to straight techno or pop music the subtlety in compression increases. As they are both primarily created for dancing the drums and other rhythmic lines need to stand out and be felt where as a song like this doesn’t necessarily need the same amount of force in its rhythm section. The are I think compression would have been used the most is in the vocals. As her singing style and voice aren’t particularly strong or aggressive there most likely would’ve been some compression to bring her levels in line with the other instrumentation. By doing this they can keep the gentle vocal style and have them still stand out as a focal point in the song.
Stereo Soundfield
Because of the genre and feel of this song, instruments have been placed in the soundfield in a fairly traditional way. There are some creative uses of panning in the delays and echos but overall it is quite standard. The bass and vocals can be heard in the centre of the mix which is common as it gives the vocals the ability to cut through the other elements. The acoustic guitar sits panned to the left which lets it stand out as a point of interest. As discussed earlier with the resonator synth there is a fair use of panning effects present. Both this synth and the vocal delays bounce from the left to right channel in an effect that is similar to chorus. The drum kit in this song is very basic containing only a kick and snare. The kick and snare stay centered throughout the song. The snare is interesting because of how loosely it is being played. This causes the snares signal to not sit exactly centre but slightly wander inside the stereo field.
Recently I contacted a film student who was producing a minute long horror short film. She was looking for some one to score the film and me having an interest and background in both music for film and experimental/dark music I thought it would be a great opportunity. We had a short time frame for work with about a week before their product was due.
The reference track that she showed me was the American Horror Story theme song which I was familiar with having seen the show.
I didn’t want to directly copy the music but the requests from the director were leading me down a very similar path to the theme. I did my best to make my music fit the theme and still be it’s own original piece that stood out from the reference. A lot of the critiscim I was getting from the director was that it needed to be a lot grittier, harsher and louder. While I didn’t entirely agree that it fit the aesthetic look of the film I obliged their requests and finished with a product that they were thrilled with. Hopefully they will be putting the film up on a streaming website soon so you can get a look at it but for now I’ll put the song on here for you to listen to. Any feedback would be great!
I’m sure most of us are familiar with the distinct sounds of distortion in rock, punk and metal music. Take the example below, the guitars have distortion applied to them giving a warm, phat sound. (It’s also one of my all time favourite emo songs if you’re wondering)
There are many ways to achieve distortion using different processes. By taking a waveform and changing the properties of it, the resulting sound is what we can refer to as distortion. Clipping occurs in production when a signal is pushed beyond it’s limit. In doing this the wave shape is changed through the addition of odd harmonics. I found a blog that neatly discusses nonlinear distortion here. While leaning more to the technical side of electronics it’s still easy to see how an inputted sound wave can be morphed before being outputted again.
We can achieve clipping inside a daw by pushing the output volume of a track to the maximum. Here I’ve taken a drum loop from Ableton’s library.The normal unedited signal is clean and easy to hear.
If I push the signal level using utility to +35dB we can start to hear distortion forming as the waveform changes shape. You might want to turn your volume down a bit for this one (unless you’re a harsh noise fan)
Not only can we hear the difference in the samples above we can see them too. If i import this file back into Ableton you can see that the waveform has been severely changed.
The peaks of the wave have been flattened and the overall shape has changed. This means the wave is no longer producing the same sounds on output.
Distortion has a place in musical production from adding grittiness to vocals, warming up a guitar part or producing an over the top wall of sound in noise music. While this demonstration pushed a sound source more than would be normally used in production it is a good example to show the basic understanding of how a waveform can be distorted.